Tuesday, September 7, 2010
Dynamics and Non-Dynamics
The terms Dynamics and Dynamic Animation refer to animation motion created by fields, emission, collisions, springs, goals, and particle expressions. Non-dynamic animation is motion created by keys, motion paths, non-particle shape expressions, deformers, and constraints unrelated to rigid bodies.
Thursday, August 12, 2010
Wednesday, July 28, 2010
Tuesday, July 20, 2010
Different areas in Visual Effects World
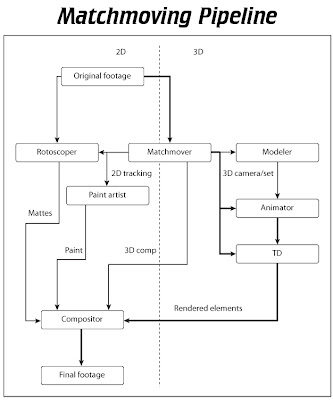
- CGI Compositing, Set Extension, Match Moving
- Bluescreen Compositing, Motion Tracking,
- Warping and Morphing, Bullet Time Shots,
- Crowd Duplication, Atmospherics
- Rotoscoping, Wire Removal, Scene Salvage
- Node-Based & Layer-Based Compositing
Bluescreen vs. Greenscreen
• The choice of backing color may be dictated by the colors in the objects being fi lmed. If the
foreground objects have a lot of green, then you should use bluescreen, and if the foreground
objects have a lot of blue, then you should use greenscreen.
• It is not true that a digital keyer “prefers” blue or green as they work equally well on equally
well-shot plates.
• Skin tones work equally well with green or blue backings when using modern digital keyers.
• Green is easier to light brightly than blue, which requires less lighting on the set.
• Bluescreens lit by natural sunlight work well too. Throw up a large diffusion silk to kill shadows
if needed, or schedule an overcast sky for the day of the shoot.
• Blue spill is less of a problem than green spill because of its less offensive hue and its lower
intensity. However, digital keyers have excellent despill tools that normally render this point
moot.
• The blue channels of both fi lm and video by far have the most noise, so a bluescreen produces
mattes with the noisiest matte edges.
• The green channels of both fi lm and video have low noise content, so it produces the smoothest
matte edges. This is one very compelling reason to shoot greenscreen, with all else being equal.
Thursday, June 10, 2010
DefaultLightSet in Outliner
In Maya defaultLightSet in outliner view is only includes lights in scene
which have Illuminates by Default option on in attribute editor.
which have Illuminates by Default option on in attribute editor.
Thursday, June 3, 2010
Full body IK workflow
Each of the following steps are mandatory when using FBIK in Maya unless otherwise specified.
1. Prepare your character for full body IK.
2. Label or rename your character’s joints.
3. Create the full body IK system for your character.
4. Pose your characters with FBIK.
5. Key your character’s movements with FBIK.
1. Prepare your character for full body IK.
2. Label or rename your character’s joints.
3. Create the full body IK system for your character.
4. Pose your characters with FBIK.
5. Key your character’s movements with FBIK.
Friday, May 21, 2010
Discrete Move Setting
For specific distance, You can use the Discrete Move setting from the Move Tool as a virtual grid for components and objects in Maya.
Camera limitations in Maya
Look Through Selected
Look Through Selected can produce unexpected results if the camera is duplicated, or the scene is saved.
Manipulator undo and two- or three-node cameras
Manipulator undo does not work for two- or three-node cameras.
Problems if camera not proportionally scaled
Problems exist if the camera is not proportionally scaled. The view and render will be skewed and manipulation may result in odd behavior.
(Source : Maya Help)
Subscribe to:
Comments (Atom)


